l3gui - graphical environment for interacting with l3 programs and data.
l3gui
[—help | -h]
[—version]
[-f FILE | —file=FILE]
[-s STATEFILE | —statefile=STATEFILE]
[-i | —interactive]
[-d | —developer]
The l3gui(1) command starts an interactive graphical interface for
editing, viewing and executing l3 language scripts and viewing and
editing the data produced by the scripts.
See l3lang(1) for a language description.
Standard facilities include interactive toplevels for l3 and Python,
and a worksheet-style interface for l3 scripts providing editing
facilities and the usual open/edit/save options.
The l3 language introduces several new features to support use from a
graphical interface; they are:
-
A script is used as its own data browser.
Every expression is turned into an object with inspection
facilities. Both the expression and the value(s) computed by the
expression can be accessed through the script's text.
-
Scripts can evolve, even after execution. The combination of
need-based evaluation, lexical scoping and persistence allows l3
scripts to evolve; they can be added to without re-running
existing code, and references to all previouly computed data are
available.
-
Scripts can nest arbitrarily. Lexical scoping allows for
arbitrarily nested (static) namespaces and avoids name collisions.
Every function call introduces a new (dynamic) scope, so
multiple calls to the same function do not produce naming conflicts,
even when file names are used. Multiple calls to a function are
tracked separately, so all values computed by all calls to a
function can be inspected.
-
A data flow graph can be generated from a script.
In this view, named data are emphasized, and data interdependencies
shown. Loops cause no “explosion” of the data flow graph.
The typical l3 usage cycle is very similar to scripting
sessions:
-
Select scripts / functions from a library
-
Assemble custom scripts on the canvas
-
Adjust parameters and scripts
-
Run the script
-
Examine values
-
Repeat the process
The l3 gui provides several features to simplify high-level script
use, full editing for control over detail, make(1)-like
incremental evaluation and persistence to avoid unnecessary
repetition, and data examination through the scripts themselves.
While the l3 gui could be used for script writing (via graphical
assembly), it is meant for script use and user interaction.
User-assembled scripts should be high-level and consist mostly of
topic-specific blocks (with parameters), loops, functions and
conditionals.
Practical use of the l3 gui requires a library callable from Python
and a collection of simple Python/l3 drivers (scripts with parameters)
for that library.
For writing such drivers, use l3lang(1) directly, via a text editor.
For more complex programming, use Python to implement a library, or a
connection to a library.
The inteded use of l3gui(1), with libraries and driver scripts already
present, is illustrated via the examples at http://l3lang.sf.net.
The rest of this manual page describes the mechanics of the interface.
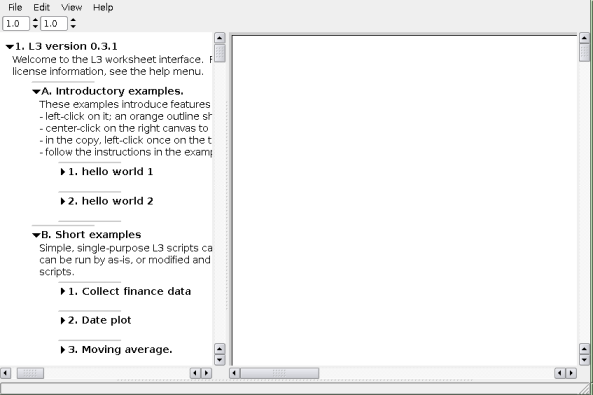
The interface starts with two canvases and some support structures as
shown in this figure.
From top to bottom, there is the menu bar, two canvas zoom selectors,
the two canvases, and a status line.
The left canvas is the library canvas, presenting examples from
introductory to complete program, and l3 templates used to assemble
custom scripts.
The right canvas is the user work area for assembling, editing,
running and examining scripts and data.
The canvases can be scrolled via the scrollbars, or via
button-1-drag on a canvas.
The relative sizes of the canvases can be adjusted by dragging the
vertical separator between them.
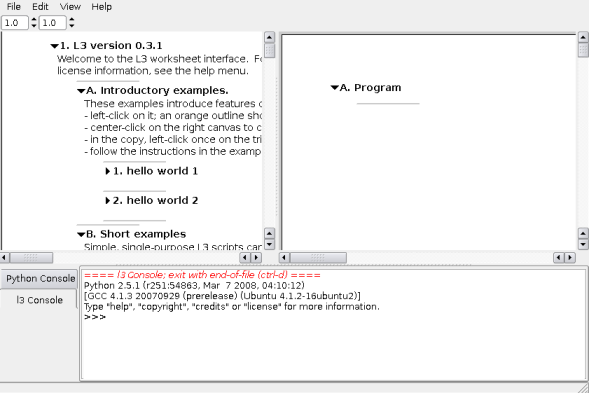
The horizontal separator between the canvases and status line can be
moved up to reveal a Python console and any l3 consoles present. See
also the View menu entries.
Fully exposed, the interface looks like the following.
The menubar entries are as follows; more details are found later in
this manual.
-
File menu
-
-
import script
-
Load a script from a file. The script is added to the session.
-
save session to
-
Save the current session to file.
-
load session
-
Load a prior session from file. This replaces the current session
-
exit
-
Exit the gui unless -i was used; with -i, starts Python on the
console.
-
Edit menu
-
-
l3 gui console
-
Run an interactive l3 toplevel in an area below the canvas, insert
expressions in a single Program on the canvas.
-
l3 terminal console
-
Run an interactive l3 toplevel on the console, insert expressions
in a single Program on the canvas.
-
l3 terminal console, one program/expr
-
Run an interactive l3 toplevel on the console, insert every
expression as a separate program on the canvas.
-
View menu
-
-
show / hide python console
-
toggle visibility of areas below the canvases.
-
show program only
-
Hide the left canvas and areas below the canvas.
-
Help menu
-
-
About l3
-
Show version information.
-
l3 manual
-
Show references to this manual.
-
l3 License
-
Display the license for l3.
The mouse buttons are referred to as button-1 through button-3. On
a right-handed mouse, button-1 is the left button, button-2 is the
scrollwheel button, and button-3 is the right button.
The keyboard's Ctrl and Alt keys are called control and alt here.
The currently selected items are outlined in orange. Items are
selected via the mouse in two ways.
-
button-1 on item
-
Select the item under the pointer, clear existing selection.
-
control + button-1 on item
-
Add the item under the pointer to the existing selection.
A selection can be copied to the canvas, or moved into another
expression.
-
button-2 on canvas
-
Insert a copy of the current selection; if there is no selection,
try to parse the text on the clipboard and insert the resulting
script.
-
button-2 on list item separator
-
Move the current selection into the list at this location (the top
item when multiple items are selected).
The selection can be cleared.
-
button-1 on canvas (without dragging)
-
Clear the selection.
The session state includes all visible scripts and data, their display
positions, and all data accumulated during program execution.
The current session can be saved when no program is executing, via
file > save session to.
Restoring a session from a file replaces the current session, which
must be saved if it is to be kept. To restore a session, use
file > load session.
The gui provides several ways to get scripts for further assembly and
use. Once imported, the script is treated as a structure, although
the display still resembles the original text. Most expressions
display in the original's text form, but source code lines are
separated with a narrow horizontal marker that can be used for
insertion. All imported scripts are put into a Program block to
allow for collapsing/expanding and execution of the script.
10.1. Copying from the procedure library
Prepackaged functionality provided for l3 is kept in the left canvas
as outline. Select the parts of interest via button-1, copy them to
the canvas via button-2, and adjust parameters as described in
the EDITING PROGRAMS section.
10.2. Pasting text
Short script fragments copied from another application can be pasted
via button-2 on the canvas if no other expression is currently
selected. To paste text, first use button-1 on the canvas to clear
its selection, then button-2 to paste the text.
The pasted text is parsed and checked for valid syntax, but not
executed. If the syntax is valid, a script is inserted as a Program
at the mouse location. Otherwise, a single string holding the pasted
text is inserted.
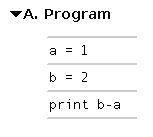
Example: Successful pasting of script
after pasting via button-1 (to clear any other selection) followed
by button-2.
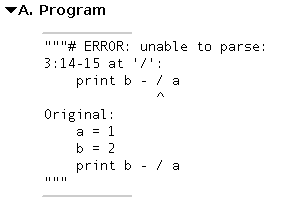
Example: Unsuccessful pasting of script
a = 1
b = 2
print b - / a
contains a syntax error and looks like
after pasting via button-1 (to clear any other selection) followed
by button-2.
10.3. Importing from file
For writing larger scripts from scratch, using a text editor with
support for Python programs is strongly recommended. See emacs(1) or
vim(1). Once such a script is written (and ideally, tested on trivial
data using Python), it can be imported via file > import script.
For more interactive use, command-line input can be used.
Using the menu > edit > l3 terminal console selection, an interactive l3
toplevel is run on the console the gui was started from. At the same
time, a new empty Program: is inserted on the canvas.
Expressions can be entered at the toplevel in the same way as in
Python, and are evaluated when complete. If evaluation succeeds, the
expression is appended to the Program: and the l3 structural
manipulations are then available; in particular, the value(s) may be
examined.
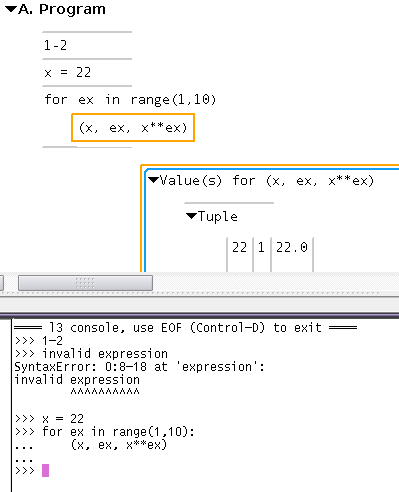
Example: Using the toplevel with the gui.
The toplevel is is started and expressions tried. The Program
accumulates the history of successful commands, while the values
accumulated by the loop are inserted via the gui menu.
At any time expressions may be inserted in the history through the
gui, and the Program re-run. As for any l3 program, only the
inserted expression is run, providing a way to evolve running programs
through insertion, not only appending.
The editing facilities of l3gui are focused on structural editing —
insertion and removal of expressions, and the selection of values
associated with expressions. These operations can be done any time,
but are most useful after a script has been run (whether successfully
or not), and allow incremental refinement of scripts.
Notably absent is an advanced text-editing facility, as there
are better and established tools for writing scripts. For the simple
textual edits required (such as setting parameter values and other
form-filling), a simple edit window is used.
Most expressions display as text, but outlines, programs, lists,
functions, conditionals and loops can display in long form.
Programs, lists and tuples displayed in long form have explicit item
separators that allow insertion of items in the position of the
separator, by selecting an item elsewhere and using button-2 on the
separator.
Items already in the list/tuple can be dragged out via button-1-drag.
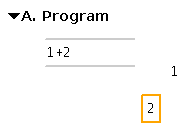
Example: Editing long-form expressions
and via button-1 select the 1; this highlights just 1.
On the canvas next to the program, press button-2; a copy of the
1 is put at the pointer location. Repeat this for the 2 to get
something like the following.
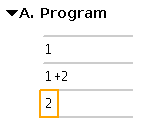
To insert the 1 into the program, select the copy via
button-1 and click on the grey bar above the 1+2 with button-2.
Repeat this for the 2 to get a new program:
Text display allows selecting of individual subexpressions, but
editing is always done on the entire textual expression.
Double-clicking button-1 on an expression pops up a simple edit
window. In the window, ESC or Cancel abort the edit, while
Ctrl-Enter or Ok commits the change.
Note
In the edit window, replacing a script expression with another
containing the same text and pressing Ok is not the same as
pressing Cancel. Replacing an expression always removes the
original and inserts the new one, even if the text is identical.
And a new expression will be evaluated again when its containing
Program: is run. See incremental evaluation.
Prior sections discuss obtaining and manipulate expressions. Further
operations are specific to that expression, and are available through
the expression's menu, accessed via Button-3.
The following is a summary of the menu entries. Their usage details
follow.
12.1. Common entries
Every expression has these menu entries.
-
add comment
-
Add a comment to the expression. This inserts the template
“double-click to edit” which can be edited.
-
copy to clipboard (as raw text)
-
Form a pretty-printed string representation of this expression and
copy it to the clipboard.
-
delete
-
Delete this expression.
-
delete selected
-
Delete all selected expressions. This entry is for convenience
and may not affect its expression.
-
dump code
-
(developer) Print an AST dump of the expression to the console,
including ID and timestamp for every node.
-
dump values
-
(developer) Print all values of the expression the expression to
the console, with indentation indicating clone structure.
-
export values as string
-
Print all values of the expression to the console.
-
insert values as l3 list
-
Insert a vertical list holding all the values associated with the
selected expression.
-
insert values as l3 list list
-
Insert a near-square list of lists holding all the values
associated with the selected expression. Makes better use of
display area.
-
evaluate locally
-
(developer) Start a new Python toplevel at the bottom of the gui,
with self bound in its environment.
-
evaluate locally, use console
-
(developer) Start a new Python toplevel on the console,
with self bound in its environment.
-
exit
-
Exit the gui unless -i was used; with -i, starts Python on the
console.
-
hide
-
Display this expression in a compact, single-line form.
-
select value
-
Deprecated. Value selection is done using the selection. See
narrowing the data selection.
12.2. Additions for outlines/programs
Only a Program (outline) expression has a Run menu entry, so to execute a
fragment of code that is not already inside a program requires putting
it in one.
-
run code
-
Execute this program.
-
view full contents
-
Show this outline, its comment, and the full contents. Program
editing is only possible in this view.
-
view nested outlines
-
Show this outline, its comment, and all contained outlines.
-
view this level only
-
Collapse the outline to this level.
-
show values written
-
Show all names assigned to in this outline.
-
show values read
-
Show all names referred to in this outline.
12.3. Additions for the selection
The selection is the orange outline surrounding one or more
expressions;
in addition to highlighting items, it also provides some features of
its own.
-
print values in context
-
When an expression is used in loops or multiple function calls,
values can be viewed more selectively by narrowing to one of the
loops/function calls. See
Narrowing the data selection.
-
item screenshot to /tmp/foo.png
-
For development. Take a screenshot of just this item, save to
/tmp/foo.png. Requires the canvas to be at the upper left scroll
limits.
12.4. Additions for list item separators
The list item separators serve to insert items, but can also be used
to select a range of items between two of them.
-
set mark
-
Set end position for range selection.
-
select region (from here to mark)
-
Select all items in the range.
12.5. Additions for strings representing local files
For files holding known data of certain type, special viewing /
insertion actions are available.
First are those calling external programs to view files.
-
.spi -> xmipp_show -sel <path>
-
Display spider selection file via xmipp_show
-
.spi -> xmipp_show -vol <path>
-
Display spider volume file via xmipp_show
-
.txt -> $EDITOR <path>
-
Open a plain text file in an external editor.
The following files types are directly handled in l3.
-
.png -> view image
-
Insert a view of the image on the canvas.
-
.hdf file -> insert as l3 list
-
For HDF files using a simple list-of-images structure (eman2),
display a vertical list of images.
-
.hdf file -> insert as l3 list list
-
For HDF files using a simple list-of-images structure (eman2),
try to display a square array of images to maximize use of canvas
area.
12.6. Additions for names with string values representing local files
Name expression (a, "a", and a.b) with string values that
represent local files have entries
to view those files.
-
.any -> insert (file path) list
-
Insert the list of files represented by the name.
-
.png -> insert (file path, image) list
-
Insert the list of (file name, image) tuples represented by the
name.
12.7. Additions for `Map`s
-
examine dir
-
Treat a map like a directory and list all names bound in it.
-
print working directory (pwd)
-
(deprecated) For a Subdir, show its name.
12.8. Additions for some native Python values
Values representing images (certain numpy arrays) have some simple
display adjustments
-
set image size as default
-
Set the current scale size as default for future image insertions.
-
shrink image 40%
-
Reduce this image by 40%. Does not affect future image insertions.
-
enlarge image 40%
-
Enlarge this image by 40%. Does not affect future image insertions.
Code in l3 is never executed automatically. Further, execution can
only start from programs (which display as outlines).
Example: Running a program
Then right-click (button-3) on Program > run code. The text
(1, INT) is shown on the console, where INT is some integer. The
2 is highlighted in an orange outline.
Because expressions and outlines can nest, it is possible to start
execution from the “inside” of a program. This is not necessary
because l3 evaluation skips already-executed expressions, but it can
be convenient while working on a nested script. If needed values have
not been calculated, an error is given and execution of the program
stops at the error location.
Data are the result of expression evaluation. L3 attaches
a datum to the expression that created it, allowing point-and-click
examination of data.
14.1. Simple data selection
For scripts with single-level loops or function calls, a single
item selection is sufficient to view data.
Example: Selection of datum value.
Paste and run the program
Then select the - menu (button-3) and dump values.
Note that there is only one value, 1.
Expressions inside loops or tail calls may have more than one value,
so every expression's menu has a dump values entry that prints all
values associated with the expression to the terminal.
Example: Selection of data values.
Paste and run the program
for ii in [1,2,3]:
    ii - 3
Then
select the - menu (button-3) and dump values.
Note that there are now three values.
Instead of printing values, values can be wrapped as l3 expressions
and inserted on the canvas, using the insert values as menu entry.
In this form, values are ready to be used in or by other scripts.
Wrapped values are referenced, not copied.
Example: Insertion of data values.
Paste and run the program
for ii in [1,2,3]:
    ii - 3
To import these values for further editing,
select the - menu (button-3) and insert values as l3 list.
This inserts a list containing the values.
When a data to PNG converter is available, the bitmap image is
displayed by l3gui instead of the textual representation of the data.
These custom viewers are never interactive, and are intended to
provide a quantitative view only. The image is manipulated just like
any other value.
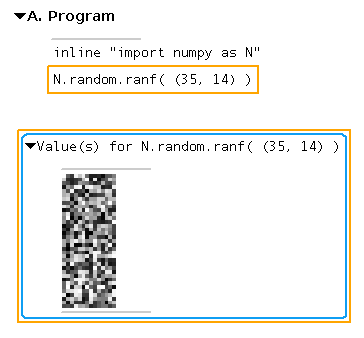
Example: Insertion of data thumbnails.
inline "import numpy as N"
N.random.ranf( (35, 14) )
and run the program. The array data is printed to the console. Now
right-click N and select insert values as l3 list. This inserts a
list with one entry, the image. Right-click the image, select
enlarge image 40% several times. This will look like the following.
For more detailed data examination or manipulation, data must be saved
to file and external processes used. File names should be formed via
e.g.
'_plot-%d.png' % new_id()
so their names are always unique. l3 makes no attempt at tracking the
data passed out this way; instead, the data is assumed CONSTANT. If
an external program is used to modify data, the new data should be
written to a new file.
14.2. Narrowing the data selection
When loops are nested or functions called from multiple sources, the
simple selection mechanism displays all values. This is usually not
desired, so the selection can be narrowed.
Example: Selection narrowed to single function call
The following script defines a simple iteration scheme to (very) roughly
approximate sqrt(x), and tries this scheme using two starting values.
# Sqrt iteration with error bound.
def try(x, xn):
    if abs(xn**2 - x) > 0.0001:
        xnp1 = 1.0 / 2 * (xn + x / xn)
        return try(x, xnp1)
    else:
        return xn
# First try.
try(9.0, 5.0)
# Try a different starting point.
try(9.0, 8.0)
To examine the values of xnp1 generated by the first try, select
xnp1 via left-click, and add try(9.0, 5.0) to the selection via
control-left-click. Then use a right-click on xnp1 and choose
insert values as l3 list to get the following.
Script execution and script writing can be mixed using the l3 gui,
without saving intermediate values to files or incurring a time
penalty for rerunning all scripts.
A program that ran successfully may reveal the need for more
information. Instead of writing a new script replicating many of the
same iterations and data references, the new relevant expressions can
be added to the existing program, and the resulting program run.
In the rerun, only the additions are executed.
Note on make(1)
This is similar to the behavior of make(1), in which targets are only
updated when their dependencies require it. Unlike make(1),
-
there is only one “target”, the successfull execution of the
program;
-
there is no search for prerequisites; variables must be bound
before use.
-
scripts can be nested, and additions can be made inside loops or
functions.
Errors in scripts return control to the user for correction, with the
faulty expression highlighted in orange. The expression can be
replaced with a correct one, and the program run again.
Execution resumes from the fixed expression; previously run code and
values produced by it are reused.
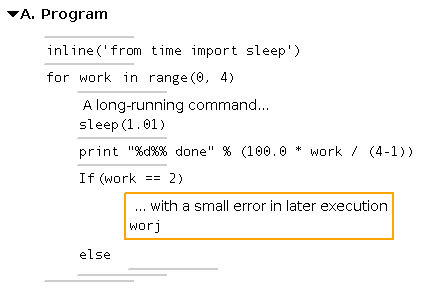
Example: Fixing a run-time error inside a program
This script has a small typo in a branch executed late in the script's
execution.
inline('from time import sleep')
for work in range(0, 4):
    # A long-running command...
    sleep(1.01)
    print "%d%% done" % (100.0 * work / (4-1))
    if (work == 2):
        # ... with a small error in later execution
        worj
Running this script takes about 3 seconds and results in the console output
0% done
33% done
66% done
Traceback (most recent call last):
...
...
l3lang.ast.UnboundSymbol: 'No binding found for: worj'
and the following display:
Fixing the error (double-click button-1 on worj and change it to
work) and running again takes only the remaining second and produces
only the output
indicating that prior parts have not been re-run.
$HOME/.l3lang/l3rc, ./.l3rc
Many annoyances; this is version 0.3.1 after all.
This manual page contains examples.
Michael Hohn, mhhohn@users.sf.net
Copyright © 2004-8 Lawrence Berkeley National Laboratory.
l3 is released under the BSD license. See license.txt for details.
